As an Amazon Associate we earn from qualifying purchases made on our website. If you make a purchase through links from this website, we may get a small share of the sale from Amazon and other similar affiliate programs.
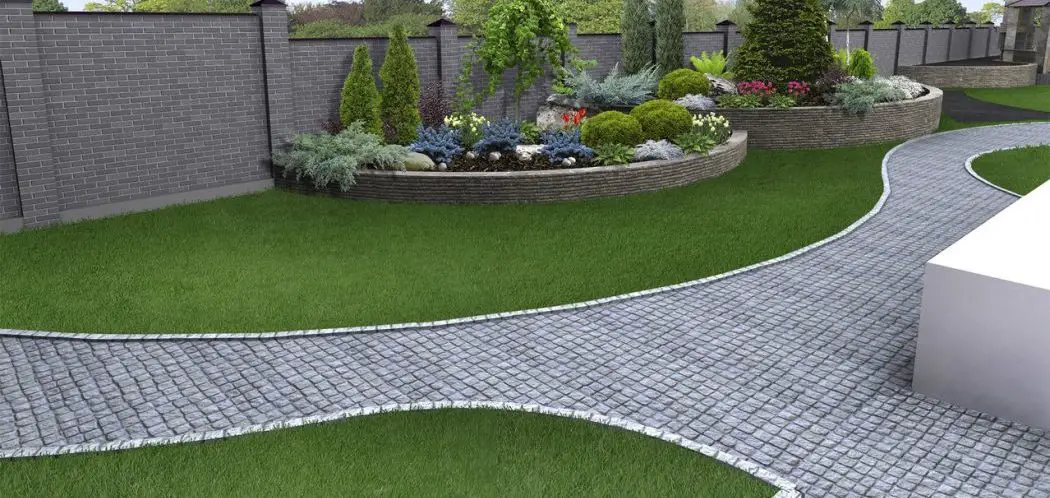
A striking, impeccable lawn relies heavily on masterful sod installation. And nowhere is workmanship and attention to detail more evident than in high-visibility corners and curves. Neat, tailored corner edges and gracefully flowing curved sod lines define a refined, polished landscape. This aesthetic perfection begins with utilizing proper sod laying techniques customized to suit these intricate spaces.
In this comprehensive guide, we’ll delve into the details on expertly installing sod around curved landscape beds, corner intersections, navigating obstacles, and any other areas where angles come into play.
Let’s begin skillfully crafting that sod installation masterpiece!
The Importance of Strategic Mapping and Planning for Corners and Curves
Meticulous, glitch-free sod installation relies first and foremost on diligent mapping and planning of all landscape shapes and features. This involves carefully measuring and outlining the exact desired dimensions of any curves, corners, beds, and edges in the installation area before beginning to lay any sod. Doing so ensures properly sized and fitted pieces can be cut for a flawlessly tight fit with minimal wastage later.
Use Temporary Guiding Lines as Visual Aids
Map out the precise shape and flow of curved edges you wish to follow using non-permanent marking methods. Options include:
Laying out pliable garden hoses in the desired shapes and curved contours.
Spraying marking paint in measured increments to trace exact contour lines on grass or soil.
Sprinkling flour or cornstarch on the ground to faintly outline sharp 90-degree edges and corners.
These temporary visual references will act as guides to cut against for cleanly executing the intended sod margins once laying begins. Resist the temptation to eyeball curves freehand without guides.
Careful Measurements Are Key for Perfectly Fit Sod
Taking precise length and width measurements at frequent, regular intervals is essential to ensure sod pieces can be properly fit together like puzzle pieces during installation.
For straight line edges, measure and mark guideline points at 1-2 foot intervals.
For curved edges, chart numerous reference points at closer 0.5 foot increments to better visualize the sod shape needed.
Account for standard sod roll widths when mapping curves to minimize seams or gaps on bends.
Double checking measurements against temporary marking lines prevents costly sod cutting or placement mistakes down the line.
Plan Quantities Needed to Minimize Waste
Estimating the total number of sod rolls or pieces required based on the measured lawn shapes will result in less discarding of randomly cut partial sections. Order rolls best matching desired curve widths where possible.
Careful planning and mapping ensures you purchase just what’s needed. This saves significant money compared to freehand visualization approaches.
With the landscape design strategically mapped out, it’s time to ensure the right tools are on hand for executing the plan…
Precision Sod Handling Tools Are Key for Perfect Results in Corners and Curves
Skillfully installing sod around the intricacies of curved landscape beds and tight inside corner angles relies heavily on having the right specialized tools for making clean, accurate cuts and seamless seams between pieces.
Invest in a Quality Sod Knife for Smooth Contoured Cuts
A razor-sharp, flat-bladed sod knife with an optimal 4-6 inch long blade allows precisely following mapped contour lines to neatly cut smooth, flowing sod edges.
As sod knives dull over time, periodically sharpening the cutting edge (approximately every 1,000 linear feet of cutting) maintains the accuracy and precision needed for intricately curved sod work.
Pro tip: When hand cutting sod edges, make several short, successive slices rather than one long sawing tear to prevent fraying or ragged seams.
Sturdy, Offset Shears Are Essential for Tight Spots
Investing in robust, extremely sharp sod shears proves invaluable for trim cutting and fitting sod segments in tight corner spots or making small adjustments to edges.
Look for offset handle designs which provide enhanced leverage and control compared to traditional inline designs when slicing through thick turf and soil.
Pro tip: Frequently remove soil buildup and debris from shears while working, and coat blades with WD-40 after each use to prevent rusting and keep cutting easy. Replace any shears once they begin feeling dull.
Use a Half Moon Edger to Define Borders
This specialized manual sod cutting tool is vital for cleanly trenching defined borders adjacent to new sod curves and edges. Trenching also improves sub-surface drainage from adjoining hardscapes.
Edgers provide an ideal guide for the sod to butt cleanly against for optimally straight margins. Make two passes with the edger to widen trenches to the necessary 3-4 inches wide and 1-2 inches deep.
Investing in quality sharpened sod prep and handling tools makes achieving precision cuts, smooth seaming, and tidy edges far easier when navigating the intricacies of curves and corners. Now let’s apply those tools to conquer the corner details…
Mastering Sod Installation Techniques In Corners and Around Obstacles
Corners and intersections where two edges meet at an angle require special care and methodical technique to avoid leaving unsightly gaps while still achieving tight, near invisible seams at junctions:
Work Outward From Straight Fixed Edges
When sodding multiple connected areas, first lay sod along any straight or fixed boundary edges that will serve as reference points. Work outward into open areas from these foundations. Complete sodding any intricate corners and junctions as the final step.
This logical order allows cleanly cutting the corner sod pieces last to achieve a custom fit against the adjoining straight edges already permanently in place rather than vice versa.
Overlap Adjacent Pieces and Double Cut for a Seamless Corner
When preparing to join perpendicular pieces, intentionally overhang the new sod slightly over the existing piece’s edge. Then slice through both layers together making the join, producing a flush, snug seam.
Any remaining small gaps left in the intersection will readily close over several weeks as the cut edge pieces root, expand, and knit together into a single integrated section.
Address Specific Corner Challenges for Optimal Results
Uplifting – Use sod staples or pins spaced every 6-12 inches to securely anchor newly joined corner seam edges together. This prevents loosening or lifting over time as sod establishes.
Drying out – Due to greater exposure, carefully water vulnerable corner seams daily until fully rooted to avoid browning out. Lightly syringe brown areas to revive until established.
Footprint damage – Restrict foot traffic and use protective planking when working around fresh sodded corners until sod firms up and hardens off to prevent seam disturbances.
With care and patience, perfectly tailored, enduring corner sod seams can be achieved. Now, we’ll conquer those sweeping curves…
Techniques for Flawlessly Installing Sod on Curves and Around Landscape Beds
Laying sod following the rounded contours of landscape beds, trees, or curved Hardscape features presents additional unique challenges. Two key techniques make properly executing curves smooth and imperceptible:
Stagger Seams in a Diagonal “Brickwork” Pattern
When laying sod around curves, stagger and offset the seams in a zig-zag arrangement, similar to a running bond brickwork pattern. This avoids lining up or stacking vertical seams that highlight any imperfections.
Staggering distributes seams evenly across the curve surface and disguises slight gaps or ridges better as the pieces settle and knit together after installation.
Taper Adjoining Sod Edges With Small Angled Cuts
Rather than bluntly abutting perpendicular 90-degree cut sod edges together around curves, taper and angle the joining cuts so edges overlap slightly and marry together.
This tapered edging minimizes pockets or lips between pieces that could trap debris or complicate mowing. The finished integration and transition between rows vastly improves.
Now let’s examine mastering the tightest turns and corners…
Finesse Tight Bends and Turns with Custom-Cut Puzzle Piece Sod Segments
For navigating sod installation around tight corners, curves, and bends tighter than standard size sod rolls or pieces normally allow:
Measure the exact unique angles needed.
Use shears to cut standard sod into sharp wedges, triangles, or trapezoids that fit together like puzzle pieces around the tight spots.
Fill any remaining small voids or gaps with sod strips cut to fit.
Carefully custom-cut to shape auxiliary sod pieces married together permit flawlessly executing the sharpest turns and building flowing curves segment-by-segment.
Securing Freshly Laid Sod in Corners and Curved Areas
With sod laid meticulously along intended outlines, taking the proper measures to secure sections ensures pieces anchoring deeply into position:
Verify Full Sod-To-Soil Contact
Work across the entire sod surface, checking for and filling any remaining air pockets or lifted edges with spare sod trimmings.
Flat, smooth contact across the entire sod bottom promotes optimal bonding so roots quickly penetrate the topsoil below and anchor firmly.
Pin Perimeters and Seams
Landscaping fabric pins inserted deeply every 6-12 inches securely pin down sod margins and seams to prevent shifting while new rooting establishes. Focus especially on pinning curves and corner junctions.
Roll for Consistent Bonding
Gently rolling the freshly laid sodded area with a water-filled lawn roller further smooths any slight inconsistencies in the surface and presses all pieces firmly into the soil subsurface.
Proper sod adhesion means newly planted pieces root deeply and permanently into the intended soil below. Now let’s examine how to assess outcomes…
Post-Installation Care and Assessment of Sod in Corners and Curved Areas
The days immediately following installation are critical for preserving your meticulous sod shaping work via vigilant watering and monitoring:
Thoroughly Inspect and Fill Any Gaps Daily
Walk the perimeter edges each day, scanning for any openings or separations in seams. Fill gaps immediately with spare sod before drying occurs. Spot sod as needed.
Probe Soil Moisture, Especially Near Edges
Use a screwdriver to probe soil moisture at edges and high areas to ensure consistent hydration while new sod roots. Ramp up watering frequency if any dryness is found.
Recognize Signs of Healthy Sod Establishment
Dark green sustained sod color, expanding growth from mowing, and pieces remaining firmly anchored in place all indicate successful rooting and establishment. Make note of any sections lagging behind.
Re-Pin Edges After Initial Rooting
Approximately 10-14 days after rooting stabilizes, remove pins and re-pin down any edges that subsequently lift or shrink. This secures margins into the secondary rooting phase.
Monitoring and gently encouraging successful sod establishment preserves all your meticulous curves, corners, and angles crafted during the initial laying process.
With care, precision, and patience, flawlessly installing sod in curved landscape beds, corner intersections, and around obstacles brings a refined polish and artisan look to any lawn. Use nuanced skills to set your landscape apart.
Have you seen or worked on an especially beautiful lawn with incredible sod installation around intricate curves and corners you’d like to recreate? Please share your thoughts or questions below!
A luscious green lawn is the sign of a healthy, well-maintained landscape. But achieving that envy-inducing carpet-like texture requires more than just regular mowing and watering. Topdressing is an...
A lush, healthy lawn is a joy to behold. But getting grass to grow can be hit or miss. You diligently plant grass seed only to end up with patchy sprouts or none at all.
This is frustrating when...